Direct answer
Custom in-ground concrete pool construction follows a rigorous 10-stage engineering process spanning 8 to 16 weeks: engineering permits, laser-guided excavation, rebar steel cage tying, rough plumbing pressure testing, pneumatic gunite application, waterline tile and stone coping, patio decking, equipment pad electrical, interior plastering, and 28-day water curing.
Key takeaways
- Municipal permits and structural engineering plans take 2 to 4 weeks prior to breaking ground.
- Plumbing pipes must be pressure-tested at 35 PSI before gunite concrete is pneumatically shot.
- Gunite requires a critical 28-day water hydration curing process before plastering can commence.
- Never drain a newly plastered pool during the initial 30 days to avoid plaster delamination.
Embarking on custom in-ground pool construction is a major structural engineering undertaking. Unlike modular vinyl-liner or pre-formed fiberglass drop-in shells, a gunite or shotcrete pool is poured as a permanent monolithic reinforced concrete structure tailored to the topography of your property.
Understanding the inground pool construction stages guide empowers property owners to monitor contractor milestones, verify critical inspections, and ensure civil engineering compliance throughout the build.
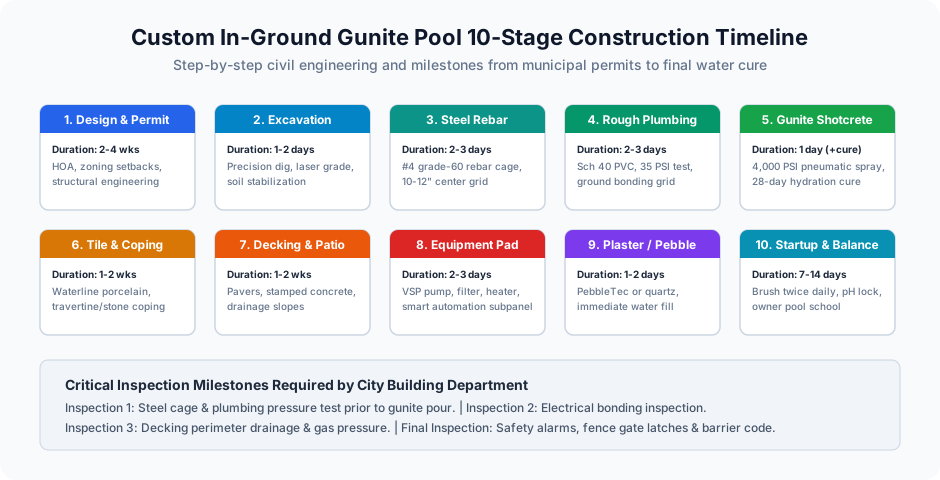
The 10 Construction Stages Explained
Stage 1: Design, Engineering & Municipal Permitting (Weeks 1–3)
Before heavy machinery arrives, civil engineers draft structural site plans detailing property setback limits, easement boundaries, soil load-bearing capacity, and electrical utility paths. Municipal building departments issue permits following zoning and safety barrier review.
Stage 2: Precision Layout & Excavation (Days 1–2 of Dig)
Contractors stake out the pool geometry using precision laser levels and wooden form boards. Heavy hydraulic excavators dig out the pool bowl, carving out shallow lounging ledges, bench seating contours, and deep-end transitions to exact dimensional depth.
Stage 3: Steel Rebar Reinforcement Cage (Days 3–5)
Technicians construct a rigid structural skeleton across the excavated bowl using Grade 60 #4 (1/2-inch) steel rebar tied in a 10-inch to 12-inch grid. Rebar chairs lift the steel 3 inches off the native soil, ensuring concrete completely encapsulates the steel reinforcement.
Stage 4: Rough Plumbing & Hydraulic Pressure Testing (Days 6–8)
All underground hydraulic lines—main bottom drains, skimmer lines, returns, hydrotherapy jets, and water feature pipes—are plumbed using Schedule 40 rigid PVC. Pipes are capped and pressurized with air or water to 35 PSI for 24+ hours to guarantee zero leaks before concrete encasement.
Stage 5: Pneumatic Gunite / Shotcrete Application (Day 9 + 28-Day Cure)
High-velocity pneumatic hoses spray 4,000+ PSI concrete over the steel rebar cage. Expert finishers hand-trowel steps, swim-outs, and walls. Critical Curing Phase: The homeowner or builder must hose down the raw gunite with fresh water 2 to 3 times daily for 14 days to slow hydration and prevent structural micro-fractures.
Finishing & Equipment Milestones
Stage 6: Waterline Tile & Coping Stone Installation (Weeks 6–8)
Frost-proof porcelain or glass waterline tiles are set with waterproof thin-set mortar. Natural travertine, bluestone, or cantilevered concrete coping is set around the perimeter rim.
Stage 7: Patio Decking & Drainage Integration (Weeks 8–10)
Surrounding decks (pavers, stamped concrete, or stone patios) are formed with a minimum 1/4-inch per foot slope away from the pool, preventing yard runoff and fertilizers from washing into the pool water.
Stage 8: Equipment Pad & Electrical Bonding (Week 11)
Variable-speed pumps, high-efficiency cartridge or DE filters, gas heaters, and salt chlorine generators are mounted on the equipment pad. Electricians tie all equipment and rebar into a continuous copper equipotential bonding loop to eliminate electrical shock hazards.
Stage 9: Interior Plaster Surface (Week 12)
Crews apply the final waterproof finish—smooth white plaster, quartz aggregate, or durable pebble finish (e.g., PebbleTec). The pool is immediately filled with fresh water without stopping to prevent hydration staining.
Stage 10: Chemical Startup & Pool School (Weeks 13–14)
Technicians balance water pH, total alkalinity, and calcium hardness. Daily brushing removes excess plaster dust while the pump runs continuously for 72 hours, bringing the pool into pristine, swim-ready condition.
Frequently asked questions
How long does it take to build an in-ground gunite swimming pool?
A standard custom concrete pool takes between 8 and 14 weeks from excavation to swimming, depending on municipal permit turnaround times, weather conditions, and surrounding hardscape complexity.
What is the difference between gunite and shotcrete in pool construction?
Gunite is a dry-mix concrete blended with water at the application nozzle tip, offering flexible work time. Shotcrete is premixed wet concrete pumped from a transit mixer. Both achieve 4,000+ PSI compressive strength when placed correctly.